Tuesday 8 October 2013

Validating Anti-Forgery Tokens over AJAX using MVC 4


In ASP.NET MVC, the HtmlHelper.AntiForgeryToken Method generates a hidden form field (anti-forgery token) that is validated when the form is submitted.

This method is essential in preventing Cross-Site Request Forgery (CSRF) attacks by using the @Html.AntiForgeryToken() helper.

What is Cross-Site Request Forgery you ask? 

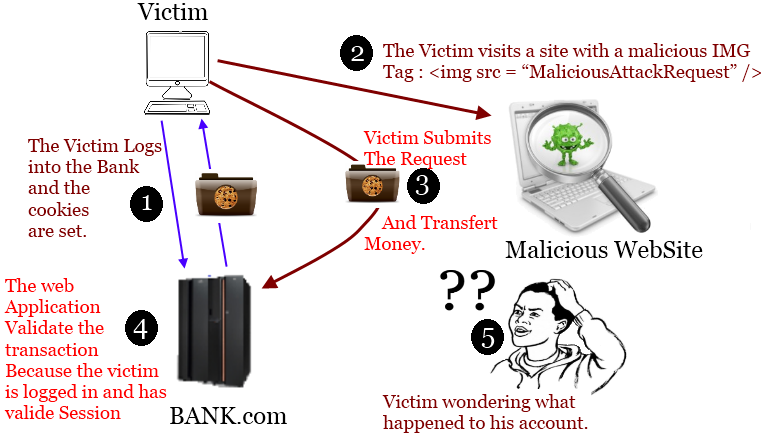
Cross-Site Request Forgery (CSRF) is an attack that tricks the victim into loading a page that contains a malicious request. It is malicious in the sense that it inherits the identity and privileges of the victim to perform an undesired function on the victim's behalf, like change the victim's e-mail address, home address, or password, or purchase something. CSRF attacks generally target functions that cause a state change on the server but can also be used to access sensitive data.

For most sites, browsers will automatically include with such requests any credentials associated with the site, such as the user's session cookie, basic auth credentials, IP address, Windows domain credentials, etc. Therefore, if the user is currently authenticated to the site, the site will have no way to distinguish this from a legitimate user request.

In this way, the attacker can make the victim perform actions that they didn't intend to, such as logout, purchase item, change account information, retrieve account information, or any other function provided by the vulnerable website.

Sometimes, it is possible to store the CSRF attack on the vulnerable site itself. Such vulnerabilities are called Stored CSRF flaws. This can be accomplished by simply storing an IMG or IFRAME tag in a field that accepts HTML, or by a more complex cross-site scripting attack. If the attack can store a CSRF attack in the site, the severity of the attack is amplified. In particular, the likelihood is increased because the victim is more likely to view the page containing the attack than some random page on the Internet. The likelihood is also increased because the victim is sure to be authenticated to the site already.

Synonyms: CSRF attacks are also known by a number of other names, including XSRF, "Sea Surf", Session Riding, Cross-Site Reference Forgery, Hostile Linking. Microsoft refers to this type of attack as a One-Click attack in their threat modeling process and many places in their online documentation.

The @Html.AntiForgeryToken() helper

Steven Sanderson's blog post "Prevent Cross-Site Request Forgery (CSRF) using ASP.NET MVC’s AntiForgeryToken() helper" is quite self explanatory on how to use the helper, but lets see how we can achieve this with our ajax requests as well.

Let's start with the JavaScript code. 

The easiest thing to do would be to create a custom ajax function where we can add the required data to pass to the server. Always good to add this layer of abstraction so that you can attach custom error handlers & what not.


//=============================================================
// This document contains common utilities that can be used in
// your Application (app). 
//=============================================================
(function (app, $) {
    app.getAntiForgeryToken = function () {
        return $('[name=__RequestVerificationToken]').val();
    };

    // Create a custom ajax function
    app.ajax = function(options) {
        
        // (a): Add the anti forgery tokens
        options.headers = options.headers || {};
        options.headers.__RequestVerificationToken = app.getAntiForgeryToken();

        // (b): Make the ajax call
        $.ajax(options);
        
    };
})(this.app = this.app || {}, jQuery);

So instead of calling $.ajax use app.ajax.

On your razor view

You simply add the call  to @Html.AntiForgeryToken(). This should generate in your html a hidden input field that looks like so ..


Your Controller

Decorate the controller with the "ValidateAntiForgeryTokenOnAllPosts" authorize attribute and add a definition for it.

 
    [AttributeUsage(AttributeTargets.Class)]
    public class ValidateAntiForgeryTokenOnAllPosts : AuthorizeAttribute
    {
        public override void OnAuthorization(AuthorizationContext filterContext)
        {
            var request = filterContext.HttpContext.Request;

            //  Only validate POSTs
            if (request.HttpMethod == WebRequestMethods.Http.Post)
            {
                //  Ajax POSTs and normal form posts have to be treated differently when it comes
                //  to validating the AntiForgeryToken
                if (request.IsAjaxRequest())
                {
                    var antiForgeryCookie = request.Cookies[AntiForgeryConfig.CookieName];

                    var cookieValue = antiForgeryCookie != null
                        ? antiForgeryCookie.Value
                        : null;

                    AntiForgery.Validate(cookieValue, request.Headers["__RequestVerificationToken"]);
                }
                else
                {
                    new ValidateAntiForgeryTokenAttribute()
                        .OnAuthorization(filterContext);
                }
            }
        }
    }

Don't forget to annotate your controller like so ..


**Note: This code is courtesy of @Richiban which made my work a whole lot easier. (http://richiban.wordpress.com/2013/02/06/validating-net-mvc-4-anti-forgery-tokens-in-ajax-requests/)

Further Reading (http://www.diaryofaninja.com/blog/2014/01/29/htmlantiforgerytoken-ndash-balancing-security-with-usability)

Wednesday 25 September 2013

Venturing into the Revealing Module Pattern with JavaScript


I came across Addy Osmani's blog post about Learning JavaScript Design Patterns the other day. Loved it!

I think I'm one of those silly developers that gets super-duper excited when I see something that I like and then get to put it in practice. Well, I did exactly that. :)

I loved what Addy said about design patterns:
"Patterns are not an exact solution. It’s important that we remember the role of a pattern is merely to provide us with a solution scheme. Patterns don’t solve all design problems nor do they replace good software designers, however, they do support them".  
Let's get into it then ..

I was writing a rule engine for a part of our application. As you can see in the code below, the sp.editor.rules namespace contains the methods such as MeetsButtonCriteria that I can call.

 
$(function () {
    if (sp && sp.editor) {
        // Initialise the rules namespace
        sp.editor.rules = sp.editor.rules || {};
        
        // Private methods
        sp.editor._AreMultipleNodesSelected = function () {
            // Logic goes here.
        };


        // Rules for buttonize
        sp.editor.rules.MeetsButtonCriteria = function (editor) {
            if (sp.editor._AreMultipleNodesSelected(editor)) {
                // More Code Here ..
            } else {
                // More Code Here ..
            }

            return true; // Temp Return True
        };
    }
});

The namespace also contains other helper methods that MeetsButtonCriteria calls such as _AreMultipleNodesSelected. In the code I simply used a convention that private methods begin with an underscore.

While that seems to do the trick, I still found that rather clunky and non-defensive. This is where I thought that the Revealing Module Pattern might help.

The main benefit of the pattern is that the pattern allows the syntax of our scripts to be more consistent. It also makes it more clear at the end of the module which of our functions and variables may be accessed publicly which eases readability.

So this is what the modified script looks like.
 
sp.editor.rules = function () {
    // Declare the Private Functions Here!
    
    var areMultipleNodesSelected = function () {
        // Logic goes here.
    };
    
    var meetsButtonCriteria = function (editor) {
        if (areMultipleNodesSelected(editor)) {
            // More Code Here ..
        } else {
            // More Code Here ..
        }

        return true; // Temp Return True
    };

    // This is what gets returned (REVEALED).
    return {
        MeetsButtonCriteria: meetsButtonCriteria
    };
}();

Easy-peasy na? Also, just a word of advise, I forgot to convert sp.editor.rules to a self executing function and spent like 15 minutes trying to figure out what was wrong. Yikes! So don't forget that.

Sunday 8 September 2013

Hack-ED with Kirk Jackson & Andy Prow


TechED 2013

I recently attended 2 amazingly fun filled Hack-Ed sessions at Microsoft's TechEd, Australia. The speakers were Kirk Jackson and Andy Prow. And as promised, there was live hacking on stage and awkward humour that will made us cringe (in a good way). Not to mention, I won a chocolate bar! Yay!

I have posed a link to both their sessions below but I though I'd quickly touch on a few important things that they spoke about. I also highly recommend you follow their blog at http://www.hack-ed.com/.

Kirk and Andy went through a couple of recent security breaches around the world (I've listed a few below). But what was really funny was that most of them were easily preventable.

I know you've probably heard this before, but as web developers, security should not be an after-thought to the development process, but rather an integral part of your design. I highly recommend that you have a read through the Open Web Application Security Project (OWASP). They have recently updated their list of top 10 vulnerabilities to look out for, available at https://www.owasp.org/index.php/Top_10_2013-Top_10.

Interesting Security Breaches

Now here are some of the interesting attacks that Kirk and Andy mentioned.


Some interesting types of attacks


Security Sessions at TechED

Hack-Ed: Wheedling and Cajoling your way to Success (http://channel9.msdn.com/Events/TechEd/Australia/2013/ATC232)


Hack-Ed: Develop your Security Spidey Sense (http://channel9.msdn.com/Events/TechEd/Australia/2013/ATC233)


Thursday 5 September 2013

I got 99 Problems but Visual Studio ain't one


Stuff from Microsoft TechED Australia 2013

So this is my first post from this year's Microsoft TechED. This being my first time to an event such as this, I've been super pumped and excited all along. The excitement and energy at the event is almost palpable.

The sessions I have attended thus far have been crazy fun. I must admit, when they previewed new features in Visual Studio 2013 I almost felt week in the knees!

Visual Studio 2013 comes with a swanky new CSS and HTML Editor with amazing type-specific intellisense. They've really taken intellisense to the next level with intellisense support for your JS Object model.

And added crazy new features, features like "Browser Link" can be described best as black magic. It leverage's SignalR and allows you to EDIT ACTUAL SOURCE CODE FROM WITHIN THE BROWSER! Say what!!!

Most of the older zen-coding features still remain, but even better, the "Format Selection" feature is so much more intuitive (I know it seems trivial but I really struggle with badly formatted code).

By the by, Visual Studio 2013 RC has been released and is available at [http://www.microsoft.com/visualstudio/eng/2013-preview#story-2013preview]. Don't forget to check out the Channel 9: Visual Studio 2013 RC video. You also might want to have a look at Scott's post about browser link (http://www.hanselman.com/blog/VisualStudio2013RCForWebDevelopersOneASPNETBrowserLinkAndOurDirection.aspx)

Loved Colin's sessions on WebAPI. Got some great pointers that I'll share in a subsequent post. Here's a sneak preview ..


Brendan's "Real Time web applications" demo of what one can achieve with SignalR was pretty impressive too. The source for his demo is at  http://t.co/EFCcrlqkoo. Brendan mentioned some interesting libraries like DurandalJS, PostalJS, Toastr, RequireJS (tutorials coming soon)

Just attended Scott Guthrie's "Building Real World Cloud Apps with Azure". Boy, does he have a presence! So much cooler to see/hear him in person instead of streaming him! Links to the source code from his presentation coming soon!

Finally a shout out to Tony Gooderham. Without your tweet I wouldn't have this title!

The sessions I plan to attend/have attended this week are as follows:

Tuesday, September 03 2013

3:15 pm - 4:30 pm
Developer Kick-Off Session: Stuff We Love Andrew Coates, Mads Kristensen, Brady Gaster, Ed Blankenship, Patrick Klug Arena 1A options

4:30 pm - 6:00 pm
Keynote: Blink and you’ll miss it Adam Pisoni Arena 2 options

6:00 pm - 9:00 pm
Welcome Reception

Wednesday, September 04 2013

8:15 am - 9:30 am
What’s New for ALM in Visual Studio 2013 and Team Foundation Server 2013 Adam Cogan, Damian Brady Central A

9:45 am - 11:00 am
What’s New in Visual Studio for Web Developers Mads Kristensen Arena 1A

11:30 am - 12:45 pm
Designing API-Enabled Applications Colin Bowern Meeting Rooms 5&6

11:30 am - 12:45 pm
Cross-Device Notification Services with C#, Xamarin and Windows Azure Mobile Services Simon Waight Arena 1A

1:45 pm - 3:00 pm
Developing Connected Apps with Windows Azure Mobile Service: Overview Nick Harris Central C

3:30 pm - 4:45 pm
Real-Time Web Applications with SignalR Brendan Kowitz Central C

5:00 pm - 6:15 pm
So, You Want to be a Professional Windows Phone Developer? Nick Randolph Central C

6:30 pm - 7:45 pm
Continuous Delivery - The Agile End to End Story for Developers & IT Pros! Morgan Webb Arena 2

Thursday, September 05 2013

8:15 am - 9:30 am
Building Cross-Platform Mobile Apps David Burela Central A

9:45 am - 11:00 am
Becoming a C# Time Lord Joseph Albahari Central A

9:45 am - 11:00 am
Cross Platform Mobile Web Development Brendan Kowitz Meeting Rooms 5&6

11:30 am - 12:45 pm
Climbing the Agile Testing Ladder featuring Visual Studio 2013, TFS 2013, Microsoft Test Manager 2013, and Lab Management 2013 Adam Cogan, Damian Brady Meeting Room 7

1:45 pm - 3:00 pm
Building Real World Cloud Apps with Windows Azure Part 1 Scott Guthrie Arena 2

3:30 pm - 4:45 pm
Unit Testing, Code Coverage, and Code Clone Analysis with Microsoft Visual Studio 2012 Richard Angus TLC - Theatre 1

5:00 pm - 6:15 pm
Load Testing with Team Foundation Service Anthony Borton Meeting Room 8

6:30 pm - 10:30 pm
Networking Event Thursday Networking Event Movie World

Friday, September 06 2013

8:15 am - 9:30 am
Using AngularJS in an ASP.Net Application Paul Glavich Meeting Room 6

9:45 am - 11:00 am
Hack-Ed: Wheedling and Cajoling your way to Success Kirk Jackson, Andy Prow Meeting Room 7

11:30 am - 12:45 pm
Hack-Ed: Develop your Security Spidey Sense Kirk Jackson, Andy Prow Meeting Room 7

1:45 pm - 3:00 pm
Azure Mobile Services Deep Dive into Node.js Scripting Glenn Block Meeting Room 6

3:00 pm - 4:00 pm
Closing Presentation: Cloud Computing: Own Tomorrow Scott Guthrie, John Azariah, James Miles Arena 2

Sunday 23 June 2013

C# Console app that displays twitter feed using Linq To Twitter (using Single User Authorization)


I recently had to add a twitter feed to my existing ASP.NET MVC 4 application. All I had to do was pull the last 10 tweets for a given user. It took me a while (shamefully, 3 hours) to get it working so I thought of writing a simple tutorial that explains how to pull a twitter feed for a console app using LINQ to Twitter.

LINQ to Twitter is an open source 3rd party LINQ Provider for the Twitter micro-blogging service. It uses standard LINQ syntax for queries and includes method calls for changes via the Twitter API

What took me long to figure out was the way twitter has implemented authentication using OAuth. Before you do anything, make sure you read the Learning to use OAuth document.

In my example, I used Single User Authorization. Single User Authorization is designed for scenarios where you'll only ever have one account accessing Twitter. i.e. if your Web site does periodic Twitter updates, regardless of user or you have a server that monitors general information. 

Before we begin coding, we'll need to set-up this authorization scheme on twitter & generate certain tokens as shown below:

Start by creating a twitter account that your application will be using to access Twitter. This is easy-peasy. Log on to https://twitter.com/ and setup your account. I've created a dummy account for this (_roehit).

Once your account is setup, navigate to https://dev.twitter.com and sign in with your twitter credentails. 

You now need to create an application. This can be done at https://dev.twitter.com/apps by clicking "Create a new application".


You need to enter your application details. You need a Name, Description & a Website (Your application's publicly accessible home page). You can add a Callback URL but its not really required. (Note: The name can't include the word "twitter".)


Remember to agree to the terms and conditions.

You should now get directed to the application page. By default, the first tab ("Details" tab) is visible. You must click the "Api Keys" tab and then click the "Create my access token" button (you will need to scroll down). This in turn generates the access tokens (you may need to refresh the page). Your Keys and Access Tokens should now be available for use.


Once created, navigate to the "OAutth tool" tab to view your OAuth Settings. We will need the generated tokens for our applications. (Note: My tokens are crossed out to maintain their integrity.)

Take note of the following tokens as we will need these later:
  • Consumer key
  • Consumer secret
  • Access token
  • Access token secret


Now we begin coding. In this example we've created a simple C# console application.

Start by creating a new project. Choose the "Console Application" template. 

Use NuGet to add the linqtotwitter package to our application. 


And now add the code shown below:
/// <summary>
/// Controls the flow of the program.
/// </summary>
/// <param name="args">The args.</param>
static void Main(string[] args)
{
    // This is a super simple example that
    // retrieves the latest tweets of a given 
    // twitter user.

    // SECTION A: Initialise local variables
    Console.WriteLine("SECTION A: Initialise local variables");

    // Access token goes here .. (Please generate your own)
    const string accessToken = "Access token goes here .. (Please generate your own)";
    // Access token secret goes here .. (Please generate your own)
    const string accessTokenSecret = "Access token secret goes here .. (Please generate your own)";

    // Api key goes here .. (Please generate your own)
    const string consumerKey = "Api key goes here .. (Please generate your own)";
    // Api secret goes here .. (Please generate your own)
    const string consumerSecret = "Api secret goes here .. (Please generate your own)";

    // The twitter account name goes here
    const string twitterAccountToDisplay = "roeburg"; 


    // SECTION B: Setup Single User Authorisation
    Console.WriteLine("SECTION B: Setup Single User Authorisation");
    var authorizer = new SingleUserAuthorizer
    {
        CredentialStore = new InMemoryCredentialStore
        {
            ConsumerKey = consumerKey,
            ConsumerSecret = consumerSecret,
            OAuthToken = accessToken,
            OAuthTokenSecret = accessTokenSecret
        }
    };

    // SECTION C: Generate the Twitter Context
    Console.WriteLine("SECTION C: Generate the Twitter Context");
    var twitterContext = new TwitterContext(authorizer);

    // SECTION D: Get Tweets for user
    Console.WriteLine("SECTION D: Get Tweets for user");
    var statusTweets = from tweet in twitterContext.Status
                        where tweet.Type == StatusType.User &&
                                tweet.ScreenName == twitterAccountToDisplay &&
                                tweet.IncludeContributorDetails == true &&
                                tweet.Count == 10 &&
                                tweet.IncludeEntities == true
                        select tweet;

    // SECTION E: Print Tweets
    Console.WriteLine("SECTION E: Print Tweets");
    PrintTweets(statusTweets);
    Console.ReadLine();
}

/// <summary>
/// Prints the tweets.
/// </summary>
/// <param name="statusTweets">The status tweets.</param>
/// <exception cref="System.NotImplementedException"></exception>
private static void PrintTweets(IQueryable<Status> statusTweets)
{
    foreach (var statusTweet in statusTweets)
    {
        Console.WriteLine(string.Format("\n\nTweet From [{0}] at [{1}]: \n-{2}",
            statusTweet.ScreenName,
            statusTweet.CreatedAt,
            statusTweet.Text));
                
        Thread.Sleep(1000);
    }
}

This should now display the last 10 tweets for the specified user.

A copy of the project is available at http://1drv.ms/NPUIVW (download the Linq2Twitter zip). This is a Visual Studio 2013 Console Application with a target framework of .NET 4.5.1 using LinqToTwitter package verison 3.0.2.

Disclaimer: The code shown above is quite crude & includes no error handling of any sort. This is just to give you a starting point. You can extend the functionality as you desire.


Wednesday 5 June 2013

ASP.NET MVC: Error after switching on compilation of views

Its always a good idea to compile your Razor views. The reason being that errors within a view file are not detected until run time.

To let you detect these errors at compile time, ASP.NET MVC projects now include an MvcBuildViews property, which is disabled by default. To enable this property, open the project file and set the MvcBuildViews property to true, as shown in the following example:


After enabling MvcBuildViews I started seeing unseemly errors like so:

error ASPCONFIG: It is an error to use a section registered as allowDefinition='MachineToApplication' beyond application level.  This error can be caused by a virtual directory not being configured as an application in IIS.

I couldn't figure it out but a colleague soon pointed out the following resource: http://stackoverflow.com/questions/5161511/mvc3-strange-error-after-switching-on-compilation-of-views

Turns out that this problem occurs when there is web project output (templated web.config or temporary publish files) in the obj folder. The ASP.NET compiler used isn't smart enough to ignore stuff in the obj folder, so it throws errors instead.

The fix was a modification to the MVC Project File as shown below:


Under the <Target Name="MvcBuildViews" AfterTargets="AfterBuild" Condition="'$(MvcBuildViews)'=='true'"> node, add the following :

<ItemGroup>
  <ExtraWebConfigs Include="$(BaseIntermediateOutputPath)\**\web.config" />
  <ExtraPackageTmp Include="$([System.IO.Directory]::GetDirectories(&quot;$(BaseIntermediateOutputPath)&quot;, &quot;PackageTmp&quot;, System.IO.SearchOption.AllDirectories))" />
</ItemGroup>
<Delete Files="@(ExtraWebConfigs)" />
<RemoveDir Directories="@(ExtraPackageTmp)" />

Tuesday 4 June 2013

Deploying an ASP.NET MVC Application using Powershell


Personally, I'm not a big fan of batch files. Don't get me wrong, while batch files are super cool at getting things done, I personally prefer the flexibility that powershell provides.

The script shown below can be used as a template to automate the website deployment process.

I have however assumed that you have MVC installed on the machine. If you do not, then you will need to add the dlls necessary to bin deploy MVC. 
There are a set of assemblies you’ll need to include with your application for it to run properly, unless they are already installed in the Global Assembly Cache (GAC) on the server. Have a look at http://haacked.com/archive/2011/05/25/bin-deploying-asp-net-mvc-3.aspx
The script leverages the appcmd utility. You need to be mindful that:
  • When running the script, you may need to set your execution policy.
  • When running this script using other automated deployment environments you may only have access to the command line so you can invoke it like so:
cmd /c powershell -ExecutionPolicy "UnRestricted" .\ApplicationDeployment.ps1 \\Path\To\Binaries\Folder 

A copy of the sample file is available here ... http://sdrv.ms/11UZKW7


Wednesday 29 May 2013

whY SLOW

Recently a friend of mine spoke to me about an amazing web development tool from Yahoo called "YSLOW"


YSlow analyzes web pages and suggests ways to improve their performance based on a set of rules for high performance web pages.

The tool runs tests & gives an overall performance score for websites. It categorises different problems on a scale of A to F with F being by-far the most urgent problems that need fixing.

For example, a test run on the NineMSN.com.au website gave an overall score of 68 & the most critical recommendations included making fewer HTTP requests, a CDN Network, Minify Javascripts, configure E-Tags etc.
 Some general rules to follow recommended by YSlow are listed below:
1.     Minimize HTTP Requests

2.     Use a Content Delivery Network
3.     Avoid empty src or href
4.     Add an Expires or a Cache-Control Header
5.     Gzip Components
6.     Put StyleSheets at the Top
7.     Put Scripts at the Bottom
8.     Avoid CSS Expressions
9.     Make JavaScript and CSS External
10.  Reduce DNS Lookups
11.  Minify JavaScript and CSS
12.  Avoid Redirects 
13.  Remove Duplicate Scripts
14.  Configure ETags
15.  Make AJAX Cacheable
16.  Use GET for AJAX Requests
17.  Reduce the Number of DOM Elements
18.  No 404s
19.  Reduce Cookie Size
20.  Use Cookie-Free Domains for Components
21.  Avoid Filters
22.  Do Not Scale Images in HTML
23.  Make favicon.ico Small and Cacheable


Terminal Server Commands: QUERY


Terminal Server Commands: QUERY

The query utilities are used to display current information about the system such as the current allocation of resources and system status. The query command can invoke any one of the query utilities. The command line format is:

query [appservers | object | process | session | user] [/?]
/? (help)

Query Appservers - Examples

To display information about all application servers found on the network, type:
query appservers

To display information about the fasteddie application server, type:
query appservers fasteddie

To display information about all application servers in domain SYSTEM, type:
query appservers /domain:system

To display the network and node address for the NABBY application server, type:
query appservers NABBY /address

These commands are extremely helpful "when good servers go bad". An example is shown below. This is an easy way of checking the state of your rdp sessions on a server & resetting any connections that you need to.


Wednesday 15 May 2013

Installing and Configuring a Build Service, Build Controller and Build Agent for VS2010 and TFS2010

Install Team Foundation Build Service

This procedure describes how to install Team Foundation Build Service.

If you're installing this build service as a part of Lab Management, choose the "tfsadmin" account that you used while configuring TFS2010 for Lab Management. (Have a look at the "Prerequisites" http://msdn.microsoft.com/en-us/library/dd380687.aspx).

From the installation DVD/ISO for Visual Studio Team Foundation Server, start either the 32-bit or the 64-bit setup.exe to match the operating system that you are running.


On the Welcome page, click Next.


On the License Terms page, read the terms of the license. Click I have read and accept the license terms, and then click Next.

Click Build Service, and click Install.


If the installation wizard prompts you to restart your server, click Restart Now. After the server is restarted, installation resumes. Click Finish. ( I got an error with my installation, you shouldn't. )

Configuring the Build Service


Now that you have installed the build service components, you should be able to see Team Foundation Server Admin Console in your start menu. To open the Team Foundation Server Configuration tool from the Start menu
  • Click Start, point to All Programs, point to Microsoft Team Foundation Server 2010, and then click Team Foundation Administration Console.
  • The Team Foundation Administration Console appears.
  • Click Build Configuration, and then click Configure Installed Features.
  • The Team Foundation Server Configuration tool appears.


Note: If you can't see "Build Configuration" it may be because TFS Power Tools at some point was installed on the system. There was a problem with the backup power tool that caused some nodes not to show up. If that’s the case, under HKLM\Software\Microsoft\TeamFoundationServer\10.0\Plugins there will probably be two nodes – one for backup and one for TeamBuild – removing the backup plug-in node would probably resolve the problem. You could also check the admin log to see if there are exceptions in there, and perhaps export the TFS registry key above. 

Under the build configuration navigation tab, you should see a link to "Configure Installed Features". Clicking the link should start the wizard.


Choose your team project collection.


Ensure that you configure the build service later.


Choose the "tfsadmin" account that you used while configuring TFS2010 for Lab Management.


Now that you've finished the configuration, you should see the build service in the build configuration tab.

You can now use the links to create a build controller & a build agent.


Sunday 12 May 2013

Installing and Configuring a Test Controller and a Test Agent for VS2010 and TFS 2010


To run tests remotely on one or more computers using Microsoft Visual Studio 2010, you have to install a test controller, and test agents. You install a test controller on any suitable computer, and a test agent on each of the computers that are running components of the system under test. The test controller communicates with the test agents to initiate the tests and to collect test result data.

Before you install test controller and test agents, you should verify that you have the required hardware and software to meet your specific needs. For detailed information on test controller and test agent hardware and software requirements, see Test Controller and Test Agent Requirements.

There are two principal scenarios in which you install test controllers and agents:

Remote tests: You want to run tests by using Visual Studio 2010, and you want to run the system on one or more computers that are separate from your Visual Studio computer.
In this case you have to:


  • Install a test controller on a suitable machine.
  • Install a test agent on each machine on which the system under test will run.
  • Register each test agent with the test controller.


Lab tests: You want to run tests either manually or automatically on a lab environment by using Microsoft Test Manager and Visual Studio Lab Management. In this case you have to:


  • Install a test controller on a suitable machine.
  • Register the test controller with a Team Foundation project.
  • Install a test agent on each computer or virtual machine template on which tests will be run.

You can start by grabbing the ISO from http://www.microsoft.com/en-us/download/details.aspx?id=1334

Installing and Configuring a Test Controller

A single test controller manages one or more test agents by sending information to test agents about the task that the agent has to perform.

To install it, mount the ISO you downloaded and you should be able to run the setup.exe like so:

Select the "Install Microsoft Visual Studio Test Controller 2010".


Accept the terms & conditions.


Select the drive & click Install.


Once the installation has finished, click configure.


If you're installing this controller as a part of Lab Management, choose the "tfsadmin" account that you used while configuring TFS2010 for Lab Management. (Have a look at the "Prerequisites" http://msdn.microsoft.com/en-us/library/dd380687.aspx).

Register with the Team Project Collection you require.


You now need to "Apply Settings".


Installing and Configuring a Test Agent


A test agent can be installed in the following ways:
  • As a service
  • As an interactive process

If you want to run tests that interact with your desktop, such as coded UI tests, you must install the test agent that runs these tests as an interactive process. When you configure the test agent as part of the installation process, you can select how you want to run the agent. For more information about how to run a test agent as a process, see How to: Set Up Your Test Agent to Run Tests that Interact with the Desktop.

To install it, mount the ISO you downloaded and you should be able to run the setup.exe like so:

Click "Install Microsoft Visual Studio Test Agent 2010" and then you'll need to accept terms and conditions.


Choose the drive you'd like to install it to.


You must now also configure your agent. If you intend to run Automated UI Tests you should run it as an interactive process.


If you're installing this controller as a part of Lab Management, choose the "tfsadmin" account that you used while configuring TFS2010 for Lab Management. (Have a look at the "Prerequisites" http://msdn.microsoft.com/en-us/library/dd380687.aspx).

This account also needs to be a local admin on the machine.


If you'd like the test controller to be responsible for agents running on virtual environments using Lab Management, leave the "Register with Test Controller" unchecked.

Else, you should point to test controller we just created. If its on the same machine, it will be localhost:6901.

All you need to do now is Apply Settings.