Showing posts with label Tutorial. Show all posts

Sunday, 12 May 2013

Installing and Configuring a Test Controller and a Test Agent for VS2010 and TFS 2010


To run tests remotely on one or more computers using Microsoft Visual Studio 2010, you have to install a test controller, and test agents. You install a test controller on any suitable computer, and a test agent on each of the computers that are running components of the system under test. The test controller communicates with the test agents to initiate the tests and to collect test result data.

Before you install test controller and test agents, you should verify that you have the required hardware and software to meet your specific needs. For detailed information on test controller and test agent hardware and software requirements, see Test Controller and Test Agent Requirements.

There are two principal scenarios in which you install test controllers and agents:

Remote tests: You want to run tests by using Visual Studio 2010, and you want to run the system on one or more computers that are separate from your Visual Studio computer.
In this case you have to:


  • Install a test controller on a suitable machine.
  • Install a test agent on each machine on which the system under test will run.
  • Register each test agent with the test controller.


Lab tests: You want to run tests either manually or automatically on a lab environment by using Microsoft Test Manager and Visual Studio Lab Management. In this case you have to:


  • Install a test controller on a suitable machine.
  • Register the test controller with a Team Foundation project.
  • Install a test agent on each computer or virtual machine template on which tests will be run.

You can start by grabbing the ISO from http://www.microsoft.com/en-us/download/details.aspx?id=1334

Installing and Configuring a Test Controller

A single test controller manages one or more test agents by sending information to test agents about the task that the agent has to perform.

To install it, mount the ISO you downloaded and you should be able to run the setup.exe like so:

Select the "Install Microsoft Visual Studio Test Controller 2010".


Accept the terms & conditions.


Select the drive & click Install.


Once the installation has finished, click configure.


If you're installing this controller as a part of Lab Management, choose the "tfsadmin" account that you used while configuring TFS2010 for Lab Management. (Have a look at the "Prerequisites" http://msdn.microsoft.com/en-us/library/dd380687.aspx).

Register with the Team Project Collection you require.


You now need to "Apply Settings".


Installing and Configuring a Test Agent


A test agent can be installed in the following ways:
  • As a service
  • As an interactive process

If you want to run tests that interact with your desktop, such as coded UI tests, you must install the test agent that runs these tests as an interactive process. When you configure the test agent as part of the installation process, you can select how you want to run the agent. For more information about how to run a test agent as a process, see How to: Set Up Your Test Agent to Run Tests that Interact with the Desktop.

To install it, mount the ISO you downloaded and you should be able to run the setup.exe like so:

Click "Install Microsoft Visual Studio Test Agent 2010" and then you'll need to accept terms and conditions.


Choose the drive you'd like to install it to.


You must now also configure your agent. If you intend to run Automated UI Tests you should run it as an interactive process.


If you're installing this controller as a part of Lab Management, choose the "tfsadmin" account that you used while configuring TFS2010 for Lab Management. (Have a look at the "Prerequisites" http://msdn.microsoft.com/en-us/library/dd380687.aspx).

This account also needs to be a local admin on the machine.


If you'd like the test controller to be responsible for agents running on virtual environments using Lab Management, leave the "Register with Test Controller" unchecked.

Else, you should point to test controller we just created. If its on the same machine, it will be localhost:6901.

All you need to do now is Apply Settings.


Tuesday, 19 February 2013

Fluent NHibernate .. Or as my manager calls it "Shibernate" (Tutorial 1)

So this is a first of a few posts I will be doing on a simple NHibernate application. This post is pretty basic but in my subsequent posts, I'll be adding more functionality and/or modifying components to include dependency injection using Microsoft Unity.

The base project is a minute modification of https://github.com/jagregory/fluent-nhibernate/wiki/Getting-started.

So here we go ...

1. Create a new Solution called "Project".

2. To it, add a class library called "Project.Domain". As the name suggests, this will represent your domain entities.


3. Create the Employee, Product and store Classes. I usually like to separate the Properties in partial classes.

 
public class Employee
{
  public virtual int Id { get; protected set; }
  public virtual string FirstName { get; set; }
  public virtual string LastName { get; set; }
  public virtual Store Store { get; set; }
}

public class Product
{
  public virtual int Id { get; protected set; }
  public virtual string Name { get; set; }
  public virtual double Price { get; set; }
  public virtual IList<Store> StoresStockedIn { get; protected set; }

  public Product()
  {
    StoresStockedIn = new List<Store>();
  }
}

public class Store
{
  public virtual int Id { get; protected set; }
  public virtual string Name { get; set; }
  public virtual IList<Product> Products { get; set; }
  public virtual IList<Employee> Staff { get; set; }

  public Store()
  {
    Products = new List<Product>();
    Staff = new List<Employee>();
  }

  public virtual void AddProduct(Product product)
  {
    product.StoresStockedIn.Add(this);
    Products.Add(product);
  }

  public virtual void AddEmployee(Employee employee)
  {
    employee.Store = this;
    Staff.Add(employee);
  }
}

4. So now, your project structure should look like ..


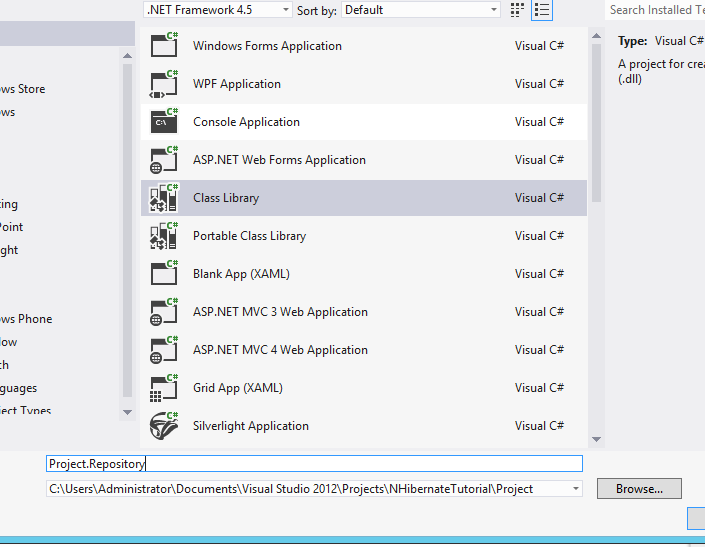
5. Add a new class library project "Project.Repository" to the solution like so ..


6. Its now time to add the relevant NuGet packages.. [ gotta love them :) ] ...


7. Its now time to create your mapping files. Start by adding a "Mappings" folder.

8. We now need to create a ClassMap for the Domain classes.
 
public class StoreMap: ClassMap<Store>
{
    public StoreMap()
    {
        // Set the Id
        Id(x => x.Id);

        // Set Properties
        Map(x => x.Name);

        // Set References
        HasMany(x => x.Staff)
            .Inverse().Cascade.All();
        HasManyToMany(x => x.Products)
            .Cascade.All().Table("StoreProduct");
    }
}

public class ProductMap: ClassMap<Product>
{
    public ProductMap()
    {
        // Set Id
        Id(x => x.Id);

        // Set Properties
        Map(x => x.Name);
        Map(x => x.Price);

        // Set References
        HasManyToMany(x => x.StoresStockedIn)
            .Cascade.All().Inverse().Table("StoreProduct");
    }
}

public class StoreMap: ClassMap<Store>
{
    public StoreMap()
    {
        // Set the Id
        Id(x => x.Id);

        // Set Properties
        Map(x => x.Name);

        // Set References
        HasMany(x => x.Staff)
            .Inverse().Cascade.All();
        HasManyToMany(x => x.Products)
            .Cascade.All().Table("StoreProduct");
    }
}

9. Remember to add a project reference to the domain project.


10.  Now lets add a Console Application "Project.DatabaseSetup" that we will use to setup the database.

11. We'll start by adding a connection string to the console app's app.config.


12. Add references to the domain and mapping projects.

13. The code for the program is given here ...
using FluentNHibernate.Cfg;
using FluentNHibernate.Cfg.Db;
using NHibernate;
using NHibernate.Tool.hbm2ddl;
using Project.Domain;
using Project.Repository.Mappings;
using System;
using System.Collections.Generic;
using System.Configuration;
using System.Linq;
using System.Text;
using System.Threading.Tasks;

namespace Project.DatabaseSetup
{
    class Program
    {
        static void Main(string[] args)
        {
            var sessionFactory = CreateSessionFactory();
            using (var session = sessionFactory.OpenSession())
            {
                using (var transaction = session.BeginTransaction())
                {
                    // create a couple of Stores each with some Products and Employees
                    var barginBasin = new Store { Name = "Bargin Basin" };
                    var superMart = new Store { Name = "SuperMart" };

                    var potatoes = new Product { Name = "Potatoes", Price = 3.60 };
                    var fish = new Product { Name = "Fish", Price = 4.49 };
                    var milk = new Product { Name = "Milk", Price = 0.79 };
                    var bread = new Product { Name = "Bread", Price = 1.29 };
                    var cheese = new Product { Name = "Cheese", Price = 2.10 };
                    var waffles = new Product { Name = "Waffles", Price = 2.41 };

                    var daisy = new Employee { FirstName = "Daisy", LastName = "Harrison" };
                    var jack = new Employee { FirstName = "Jack", LastName = "Torrance" };
                    var sue = new Employee { FirstName = "Sue", LastName = "Walkters" };
                    var bill = new Employee { FirstName = "Bill", LastName = "Taft" };
                    var joan = new Employee { FirstName = "Joan", LastName = "Pope" };

                    // add products to the stores, there's some crossover in the products in each
                    // store, because the store-product relationship is many-to-many
                    AddProductsToStore(barginBasin, potatoes, fish, milk, bread, cheese);
                    AddProductsToStore(superMart, bread, cheese, waffles);

                    // add employees to the stores, this relationship is a one-to-many, so one
                    // employee can only work at one store at a time
                    AddEmployeesToStore(barginBasin, daisy, jack, sue);
                    AddEmployeesToStore(superMart, bill, joan);

                    // save both stores, this saves everything else via cascading
                    session.SaveOrUpdate(barginBasin);
                    session.SaveOrUpdate(superMart);

                    transaction.Commit();
                }

                // retreive all stores and display them
                using (session.BeginTransaction())
                {
                    var stores = session.CreateCriteria(typeof(Store))
                    .List<Store>();

                    foreach (var store in stores)
                    {
                        WriteStorePretty(store);
                    }
                }

                System.Console.ReadKey();
            }
        }

        private static void WriteStorePretty(Store store)
        {
            System.Console.WriteLine("Store: " + store.Name);
        }

        public static void AddProductsToStore(Store store, params Product[] products)
        {
            foreach (var product in products)
            {
                store.AddProduct(product);
            }
        }

        public static void AddEmployeesToStore(Store store, params Employee[] employees)
        {
            foreach (var employee in employees)
            {
                store.AddEmployee(employee);
            }
        }

        private static ISessionFactory CreateSessionFactory()
        {
            var connectionString = ConfigurationManager
                    .ConnectionStrings["Connection"]
                    .ConnectionString;
            return Fluently
                .Configure()
                .Database(MsSqlConfiguration
                    .MsSql2008
                    .ConnectionString(connectionString))
                .Mappings(m =>
                {
                    m.FluentMappings.AddFromAssemblyOf<EmployeeMap>();
                    m.FluentMappings.AddFromAssemblyOf<ProductMap>();
                    m.FluentMappings.AddFromAssemblyOf<StoreMap>();

                })
                .ExposeConfiguration(BuildSchema)
                .BuildSessionFactory();
        }

        private static void BuildSchema(NHibernate.Cfg.Configuration config)
        {
            // this NHibernate tool takes a configuration (with mapping info in)
            // and exports a database schema from it
            new SchemaExport(config)
                .Create(false, true);
        }
    }
}

14. Remember to add the relevant project references.

15. And now, you should be able to run the application. :)


The complete source is available here: http://sdrv.ms/151sjja


References:  https://github.com/jagregory/fluent-nhibernate/wiki/Getting-started.


Tuesday, 22 January 2013

JavaScript Inheritance In 6 Basic Steps


// Define Base Class
function BaseClass() { } 

// Define a Function
BaseClass.prototype.SomeFunction = function () { alert("Base Class SomeFunction"); } 

// Define Child Class
function ChildClass() {
    BaseClass.call(this); // Call the Parent Constructor
}

// Specify that the ChildClass Inherits from the base class
ChildClass.prototype = new BaseClass(); 

// Ensure that the Child Class constructor points to itself & not the Base Class
ChildClass.prototype.constructor = ChildClass;

// Override the "SomeFunction" from the Base Class
ChildClass.prototype.SomeFunction = function () { alert("Child Class SomeFunction"); }

Now we can create an instance of the Child class like so ..
 
// Create an instance of the ChildClass
var object = new ChildClass();
And now, a call to the "SomeFunction" returns the overriden implementation.
 
// Call the "SomeFunction" method.
object.SomeFunction(); // This returns an alert containing: "Child Class SomeFunction"

References: Introduction to Object-Oriented JavaScript

Monday, 7 January 2013

Unit Testing HttpContext.Current.Session in MVC3 .NET

We recently changed some functionality where during the "CREATE" process, we go through a wizard to save application data. This data is saved only to the session in the final step when the user clicks the final submit.

This was easy enough to implement but when I started writing unit tests for my static methods that Add, Update, Delete or Modify the contents of our application data in the session, I got the following error:

System.NullReferenceException: Object reference not set to an instance of an object.


Turns out I had forgotten to setup the HttpContext.

The following "TestInitialise" method fixed my problem :)

 
[TestInitialize]
public void TestSetup()
{
    // We need to setup the Current HTTP Context as follows:            

    // Step 1: Setup the HTTP Request
    var httpRequest = new HttpRequest("", "http://localhost/", "");

    // Step 2: Setup the HTTP Response
    var httpResponce = new HttpResponse(new StringWriter());

    // Step 3: Setup the Http Context
    var httpContext = new HttpContext(httpRequest, httpResponce);
    var sessionContainer = 
        new HttpSessionStateContainer("id", 
                                       new SessionStateItemCollection(),
                                       new HttpStaticObjectsCollection(), 
                                       10, 
                                       true,
                                       HttpCookieMode.AutoDetect,
                                       SessionStateMode.InProc, 
                                       false);
    httpContext.Items["AspSession"] = 
        typeof(HttpSessionState)
        .GetConstructor(
                            BindingFlags.NonPublic | BindingFlags.Instance,
                            null, 
                            CallingConventions.Standard,
                            new[] { typeof(HttpSessionStateContainer) },
                            null)
        .Invoke(new object[] { sessionContainer });

    // Step 4: Assign the Context
    HttpContext.Current = httpContext;
}
 
[TestMethod]
public void BasicTest_Push_Item_Into_Session()
{
    // Arrange
    var itemValue = "RandomItemValue";
    var itemKey = "RandomItemKey";
            
    // Act
    HttpContext.Current.Session.Add(itemKey, itemValue);
            
    // Assert
    Assert.AreEqual(HttpContext.Current.Session[itemKey], itemValue);
}


References: http://stackoverflow.com/questions/9624242/setting-the-httpcontext-current-session-in-unit-test